If, however, F-barre is too hard for you, no worries, I recommend that you take a look at another tutorial on how to play F-chord without a barre for beginners which shows you easier variations don't actually require any barre at all.
F-barre technique
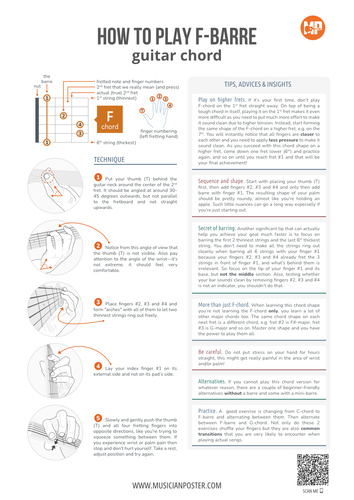
- 1. Put your thumb (T) behind the guitar neck around the center of the 2nd fret. It should be angled at around 30-45 degrees outwards, but not parallel to the fretboard and not straight upwards
- 2. Notice from this angle of view that the thumb (T) is not visible. Also pay attention to the angle of the wrist—it's not extreme, it should feel very comfortable
- 3. Place fingers #2, #3 and #4 and form "arches" with all of them to let two thinnest strings ring out freely
- 4. Lay your index finger #1 on its external side and not on its pad's side
- 5. Slowly and gently push the thumb (T) and all four fretting fingers into opposite directions, like you're trying to squeeze something between them. If you experience wrist or palm pain then stop and don't hurt yourself. Take a rest, adjust position and try again
Tips, advices and insights about the F-barre chord
- Play on higher frets. If it's your first time, don't play F‑chord on the 1st fret straight away. On top of being a tough chord in itself, playing it on the 1st fret makes it even more difficult as you need to put much more effort to make it sound clean due to higher tension. Instead, start forming the same shape of the F-chord on a higher fret, e.g. on the 7th. You will instantly notice that all fingers are closer to each other and you need to apply less pressure to make it sound clean. As you succeed with this chord shape on a higher fret, come down one fret lower (6th) and practice again, and so on until you reach fret #1 and that will be your final achievement!
- Sequence and shape. Start with placing your thumb (T) first, then add fingers #2, #3 and #4 and only then add barre with finger #1. The resulting shape of your palm should be pretty roundy, almost like you're holding an apple. Such little nuances can go a long way especially if you're just starting out.
- Secret of barring. Another significant tip that can actually help you achieve your goal much faster is to focus on barring the first 2 thinnest strings and the last 6th thickest string. You don't need to make all the strings ring out cleanly when barring all 6 strings with your finger #1 because your fingers #2, #3 and #4 already fret the 3 strings in front of finger #1, and what's behind them is irrelevant. So focus on the tip of your finger #1 and its base, but not the middle section. Also, testing whether your bar sounds clean by removing fingers #2, #3 and #4 is not an indicator, you shouldn't do that.
- More than just F-chord. When learning this chord shape you're not learning the F-chord only, you learn a lot of other major chords too. The same chord shape on each next fret is a different chord, e.g. fret #2 is F# major, fret #3 is G major and so on. Master one shape and you have the power to play them all.
- Be careful. Do not put stress on your hand for hours straight, this might get really painful in the area of wrist and/or palm!
- Alternatives. If you cannot play this chord version for whatever reason, there are a couple of beginner-friendly alternatives without a barre and some with a mini‑barre.
- Practice. A good exercise is changing from C‑chord to F‑barre and alternating between them. Then alternate between F‑barre and G‑chord. Not only do these 2 exercises shuffle your fingers but they are also common transitions that you are very likely to encounter when playing actual songs.


0 Comments