Once you feel comfortable with these easier variations I recommend that you take a look at another tutorial on how to play F-barre chord which breaks down the barre technique into easy step-by-step instructions with diagrams that you will be able to follow along.
Chords in this tutorial
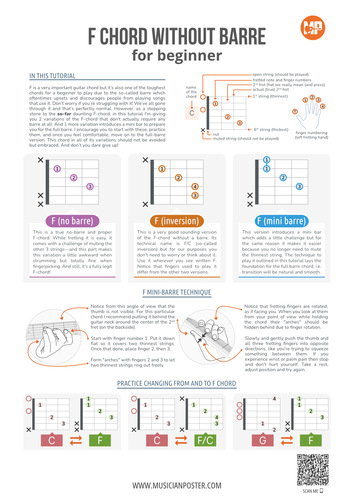
F (no barre)
This is a true no‑barre and proper F‑chord. While fretting it is easy, it comes with a challenge of muting the other 3 strings—and this part makes this variation a little awkward when strumming but totally fine when fingerpicking. And still, it's a fully legit F‑chord.F (inversion)
This is a very good sounding version of the F-chord without a barre. Its technical name is F/C (so-called inversion) but for our purposes you don't need to worry or think about it. Use it wherever you see written F. Notice that fingers used to play it differ from the other two versions.F (mini barre)
This version introduces a mini bar which adds a little challenge but for the same reason it makes it easier because you no longer need to mute the thinnest string. The technique to play it outlined in this tutorial lays the foundation for the full barre chord, i.e. transition will be natural and smooth.F mini-barre technique
- start with finger number 1. Put it down flat so it covers two thinnest strings. Once that done, place finger 2, then 3
- form "arches" with fingers 2 and 3 to let two thinnest strings ring out freely. Notice that fretting fingers are rotated, as if facing you. When you look at them from your point of view while holding the chord their "arches" should be hidden behind due to finger rotation
- notice that the thumb is not visible from the front view. For this particular chord I recommend putting it behind the guitar neck around the center of the 2nd fret (on the backside)
- slowly and gently push the thumb and all three fretting fingers into opposite directions, like you're trying to squeeze something between them. If you experience wrist or palm pain then stop and don't hurt yourself. Take a rest, adjust position and try again


0 Comments